
Can a simple side steal the spotlight at your holiday table? I set out to answer that by sharing my secret for Garlic Mashed Potatoes that beat the restaurant version. I want you to feel confident serving a dish so creamy and flavorful it needs no gravy.
My easy mashed potatoes recipe uses everyday ingredients and a few technique tweaks to boost texture and taste. I explain steps you can follow, from boiling to whipping, so each forkful is smooth and rich.
You can print this recipe pin and keep it in your kitchen for future holiday cooks. Many think the chain is the gold standard, but I will show you how to beat their version at home with clear instructions and smart swaps.
Key Takeaways
- I reveal a garlic-forward approach that stands alone without gravy.
- The recipe is simple and uses accessible ingredients.
- Technique matters: timing and whipping create the right texture.
- You can print the recipe pin for easy reuse.
- My method aims to outperform the popular restaurant classic at home.
Why Homemade Mashed Potatoes Beat Restaurant Versions
I learned that a little technique and better ingredients turn a familiar side into a showstopper.
I enjoy the rolls at Texas Roadhouse, but I make a creamier, more flavorful version at home. Making this dish yourself saves money and builds kitchen confidence.
My copycat recipe goes beyond the restaurant’s simple salt-and-pepper approach. Small swaps—warmed butter, roasted garlic, and full-fat dairy—add depth and silkiness that elevate every bite.
Controlling ingredient quality matters. Choose fresh butter, real cream, and firm potatoes for the best results. The outcome is a more satisfying side dish you can serve proudly to family and guests.
- Fresher ingredients boost flavor.
- Technique, not tricks, creates texture.
- You can adapt this mashed potatoes recipe to taste.
Essential Ingredients for Texas Roadhouse Mashed Potatoes
Start by gathering quality dairy and seasoning—these are the foundations of texture and flavor. I recommend a 5 lb bag of Russet or Yukon Gold potatoes to ensure enough body and starch.
Dairy Components
For a silky, indulgent base I use 4 oz cream cheese, 1/2 stick salted butter, 1/2 cup heavy cream, and 1/4 cup sour cream. These fats work together to create the rich mouthfeel that sets my recipe apart.
Seasoning Essentials
Season simply but confidently: 1 tablespoon garlic powder, 1/2 tablespoon salt, and 1/2 tablespoon black pepper. I combine everything in a large pot so the potatoes absorb flavor evenly during the final mash.
- Potatoes: Russet or Yukon Gold (5 lb bag).
- Fat profile: cream cheese + butter + heavy cream for high fat content and silkiness.
- Seasoning: garlic powder, salt, black pepper for balanced taste.
Choosing the Right Potato Variety

The variety you choose shapes texture, flavor, and how long it takes to cook.
I recommend a 5 lb bag of russet potatoes or yukon gold potatoes to get the best possible texture for your mash. Russet brings starch and fluff; Yukon Gold offers a naturally buttery finish.
When preparing the potato chunks, always fill a large pot with cold water before adding them. Starting cold helps the pieces cook evenly and prevents the outside from overcooking while the center stays firm.
The total boiling time is usually 15 to 20 minutes once the water reaches a rolling boil. Test with a fork: tender all the way through means you’re ready to drain and mash.
- Tip: Use russet for light, airy results.
- Tip: Choose Yukon Gold for creamier, richer texture.
- Tip: A 5 lb bag gives you enough yield and consistent pieces.
Preparing Your Kitchen Equipment

I always arrange my tools where I can reach them; it saves minutes and stress when cooking.
Start by clearing a small area on the counter so you can work without interruption. I keep my favorite peeler close at hand because I prefer it to a knife for fast, consistent prep.
The Importance of a Quality Masher
A sturdy masher is the key tool for turning boiled potato chunks into a silky side. After boiling for 15 minutes, I use the masher to stir the contents of the pot and fold in butter, cream, and seasonings.
- Peeler: I use a high-quality peeler to save prep time and get uniform pieces.
- Masher: Choose a heavy, flat-bottom masher for smooth results and less elbow work.
- Pot placement: Keep the pot steady and tools nearby so you control texture and finish.
- Maintenance: Clean and dry your masher after each use so it’s always ready.
Step by Step Guide to Creamy Mashed Potatoes

A few careful steps—peel, chop, boil, and whip—transform humble tubers into comfort food.
- Peel and rinse your potatoes, then cut them into even chunks. Place pieces in a large pot and cover with cold water.
- Bring to a boil and cook 15–20 minutes, until a fork slides through each chunk with no resistance.
- Drain and return the potatoes to the pot. Add 1/2 cup warm heavy cream and 2 tablespoons melted butter.
- Stir in 1/4 cup sour cream, 4 oz cream cheese, and 1 tablespoon garlic powder. Use a masher over low heat to fold in the mixture.
- Season with salt, pepper, and optional chicken bouillon to taste. Mash until smooth for a rich, velvety side that serves about 7 servings.
I tested this method against the texas roadhouse copycat idea, and the texture here is silkier. Use russet or yukon gold for best results and serve hot.
Secrets to Achieving the Perfect Buttery Flavor

A warm finishing touch makes the difference between good and unforgettable side dishes. I rely on a few heat-focused tricks to coax the creamiest flavor from this recipe. These steps keep the texture smooth and the taste rich.
Warming Your Ingredients
I always warm the heavy cream, melted butter, and sour cream before adding them to the pot. Warm dairy blends into hot potatoes faster and prevents the mixture from seizing up.
Before folding in, I whisk in a teaspoon of garlic powder and, if I want extra depth, a pinch of chicken bouillon while the pot sits over low heat.
Achieving the Right Consistency
If the potatoes seem a little runny, I let the pot rest for 10 minutes; the pieces will absorb extra water and firm up. Then I use a masher or whisk in the pot to reach the smooth texture I want.
I taste and add salt and pepper to balance the flavor before serving in a warm bowl.
- Tip: Warm dairy first for silkier results.
- Tip: Rest 10 minutes if the mixture is too loose.
- Tip: Mash on low heat and season to taste before serving.
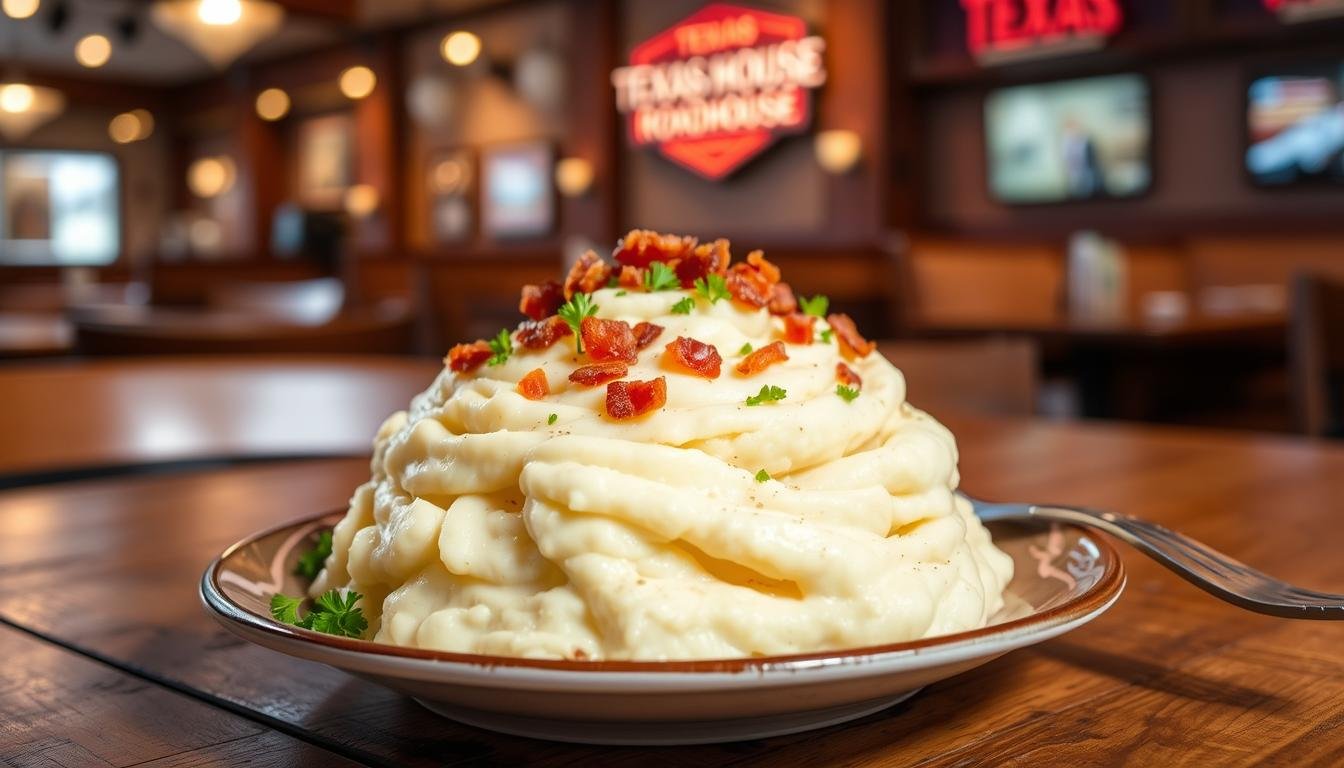
Customizing Your Side Dish with Mix-ins
Simple mix-ins let you tailor the dish to any meal or mood.
I like to add crispy bacon and shredded cheddar for a loaded flavor that still tastes like home. For creamier texture, stir in an extra 1/4 cup sour cream while the potatoes pot sits warm.
If you want more depth, a small dash of chicken bouillon blends in nicely. You can also fold in a cup of cheese for a richer finish or skip the garlic if you prefer a purer butter-and-cheese profile.
Experimenting with different ingredients is part of the fun. I test combinations in the same pot to notice how each change affects texture and taste.
Technique tip: Stir mix-ins gently into the potatoes pot to spread them evenly without overworking the starch. That keeps the result fluffy, not gluey.
- Add crispy bacon and shredded cheddar for a loaded version.
- Use an extra 1/4 cup sour cream for silkiness.
- Try a small dash of chicken bouillon for savory depth.
Storing and Reheating Leftovers
I store extra in airtight containers so the texture and flavor hold up through the week. Keep leftovers in the fridge and use them within 3–4 days for best safety and taste.
Each serving is about one cup and runs roughly 490 calories, so plan your servings accordingly. When you reheat, microwave the mixture in short bursts. Stir every 30–60 seconds so heat spreads evenly and you avoid hot spots.
If the mash seems too thick, add a splash of milk or a little warm cream. I also save any extra liquid from the pot in the fridge; it blends back in when reheating and keeps the texture creamy.
- Store airtight in fridge for 3–4 days.
- Reheat in microwave, stirring every 30–60 minutes (time minutes) — or until hot.
- Use a bit of warm water or milk to loosen the mixture if needed.
Whether you used russet potatoes or yukon gold, the fat in the recipe helps the dish reheat well without breaking down. I find that a gentle heat and a small splash of liquid restore that fresh, creamy bite.
Conclusion
Bring the comfort of a favorite restaurant into your own kitchen. Mastering this copycat recipe lets you make a warm, crowd-pleasing side that balances butter, salt, garlic, and creamy cheese with ease.
I want you to feel confident to skip the drive and serve this roadhouse mashed version at home. Print the recipe pin so it’s ready when guests arrive.
Follow the simple steps and you’ll have a reliable mashed potatoes recipe that shines at holidays and weeknight dinners. Thank you for reading—I hope your family enjoys this side dish as much as mine does.