
Have you ever wondered whether you can match a restaurant classic right in your own kitchen?
I love recreating the iconic smothered chicken texas roadhouse experience at home because it lets me control every ingredient and keep the meal juicy and flavorful. The recipe yields about 678 kcal per serving, making it a hearty dinner choice that still feels like a treat.
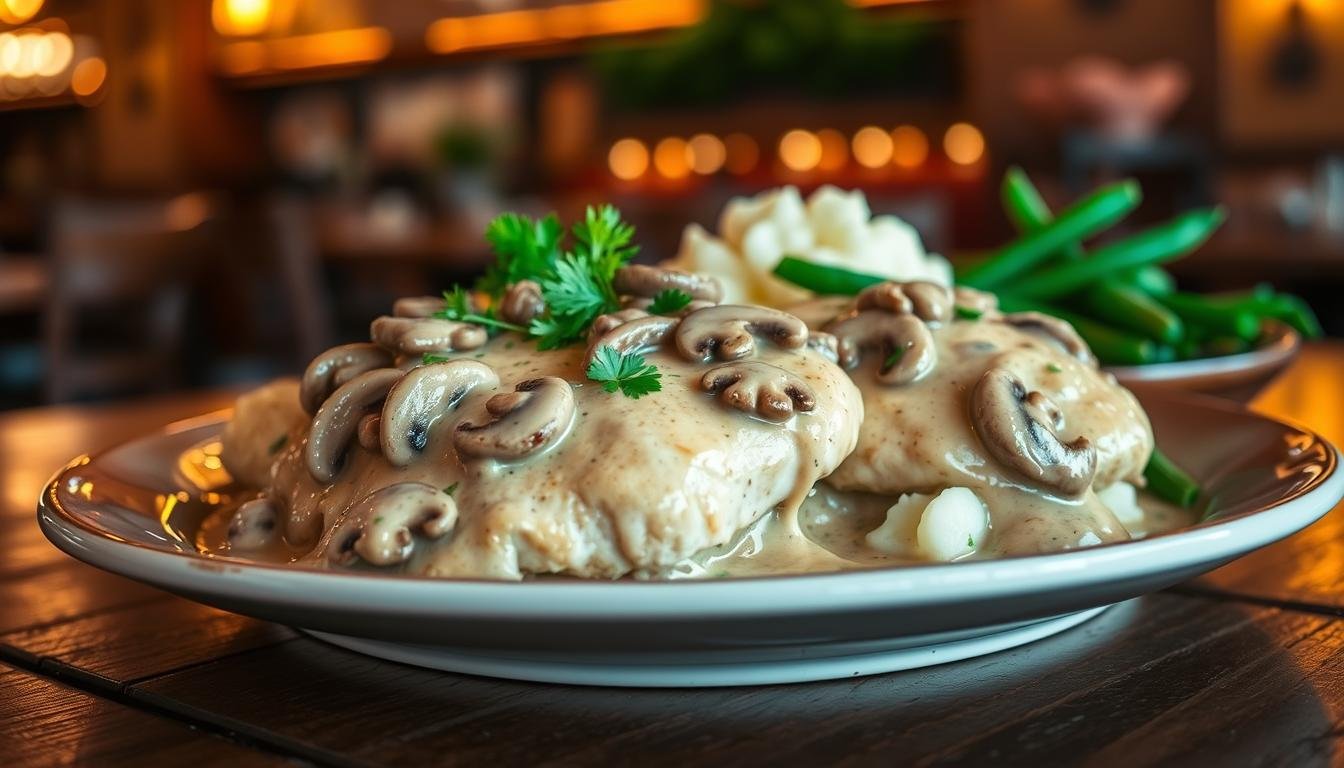
My version combines tender poultry, sautéed mushrooms and onions, and melted cheese for a rich, comforting dish. Making this at home saves a trip to the busy restaurant and often tastes just as good—or better—when you pay attention to technique.
In this article, I’ll show simple steps, key tips, and the tools I use to get consistent results. Expect easy-to-follow instructions so you can serve a top-quality meal that impresses guests without fuss.
Key Takeaways
- You can recreate the classic restaurant flavor at home with basic tools.
- The dish provides about 678 kcal per serving for a satisfying dinner.
- Sautéed mushrooms, onions, and melted cheese define the taste profile.
- Controlling ingredients ensures juiciness and consistent results.
- Simple techniques make this a reliable, impressive weeknight recipe.
Why I Love Making Smothered Chicken Texas Roadhouse at Home
Making a restaurant favorite at home gives me the freedom to tweak spice, texture, and timing for a perfect weeknight meal.
I am a big fan of recreating roadhouse smothered chicken in my kitchen because it lets me enjoy that restaurant vibe more often. Preparing this texas roadhouse classic at home means I can control the heat levels and seasoning to suit my taste.
Using a single cast iron skillet cuts cleanup and keeps the pan count low. That simple setup helps me focus on getting the best sear and kitchen timing.
The recipe brings authentic flavor to the table with minimal fuss. By mastering this version, I can recreate a night out without the wait. Cooking at home lets me prepare every component exactly how I want it.
“Cooking this dish at home is where control meets comfort.”
- I enjoy the control over spice and portion.
- The method is straightforward and builds cooking skill.
- It delivers restaurant-quality results with less hassle.
Essential Ingredients for Your Copycat Dish

Picking quality components sets the foundation for a memorable homemade version. Below I list the must-have items that deliver that restaurant-style flavor without extra fuss.
Selecting Quality Proteins
I use two medium-large chicken breasts as the primary protein. They cook evenly and keep texture consistent.
Marinade tip: Italian dressing works great. It adds the right balance of fat and acid to keep the breasts tender.
Choosing the Right Cheese
For the melt, I rely on Monterey Jack cheese. Good monterey jack melts smoothly and gives a mild, creamy finish.
- 1 cup sliced mushrooms and 1/2 cup yellow onion to create a savory topping.
- Spice blend: 1 teaspoon salt, 1/4 teaspoon black pepper, 1/4 teaspoon garlic powder, 1/4 teaspoon onion powder.
- Use 1 tablespoon olive oil and 1 tablespoon butter to sauté for perfect browning.
“Simple, high-quality ingredients are the shortcut to a restaurant-quality dish at home.”
Preparing the Chicken for Maximum Tenderness
Tender prep sets you up for a juicy final dish. I start every batch by working the meat so marinades and heat reach the center quickly.
Using a Jacquard Tool or Fork
I use a jacquard tool when I have one, but a standard table fork works just as well. I poke 10 to 15 holes in each side of the chicken breasts to create tiny channels for flavor.
This step: helps the marinade penetrate deeply, cuts down overall cooking time, and keeps the protein moist.
- I always use a fork to poke 10 to 15 holes in each side so the marinade soaks in evenly.
- Needling the meat lets the breasts cook faster and prevents dry edges during high-heat searing.
- Whether I aim for a roadhouse smothered texture or a home version, this prep makes a noticeable difference.
“Spending a few extra minutes on prep is the secret to a tender, restaurant-quality bite.”
Consistent preparation of the breasts ensures even cooking and a great side presentation. In my experience, this small step saves minutes and yields reliably juicy results every time.
The Importance of the Marinade

Marinating is the quiet step that turns simple breasts into a deeply flavored, tender meal.
I marinate the chicken breasts in one-half cup of Italian dressing for at least 2 hours so the vinegar and salt can work their magic.
The dressing supplies fat, acid, and herbs that tenderize the meat and boost overall flavor. I often let the breasts rest in the fridge for up to 24 hours when I have the extra time.
I always make sure the entire piece is coated so every bite carries the same tasty notes. This step matters for a true texas roadhouse smothered profile because it builds savory depth before searing.
- I use a gallon-sized Ziploc to hold the marinade and keep cleanup simple.
- Proper marination time turns a good meal into one that rivals a restaurant.
- For this recipe, patience equals tenderness and richer flavors.
“Allowing the meat to soak overnight is the small choice that changes the whole dish.”
Mastering the Cast Iron Sear

The right sear on the breasts turns simple ingredients into a memorable dinner. A seasoned cast iron skillet gives consistent contact heat and a reliable surface for browning.
Preheating Your Skillet
I preheat my skillet over medium-high for 3 to 5 minutes so the surface reaches ideal searing temperature. This step ensures the Maillard reaction starts immediately when the meat hits the pan.
Managing Heat Levels
I use one tablespoon of oil for the initial sear and cook the chicken breasts about 5 minutes per side. I do not move the pieces so a deep, golden-brown crust forms.
- Control the heat so you sear rather than steam; adjust after the first minute if smoking.
- After searing, I remove the breasts to a clean plate and use the same pan for the topping.
- A quick sprinkle of salt, garlic powder, and onion powder during cooking lifts the overall flavor.
“A well-heated skillet and patient sear are the secrets to restaurant-style texture.”
Sautéing Mushrooms and Onions to Perfection

A hot pan and patient hands turn simple mushrooms and onions into a rich topping. I use the same cast iron skillet from searing the chicken so the pan holds all those browned bits.
I start by melting one tablespoon of butter over medium heat. Then I add the mushrooms and onions and leave them alone for the first few minutes. Not stirring helps them brown instead of steam.
It takes about 5 to 7 minutes for the vegetables to become golden and fragrant. I season with one-quarter teaspoon each of black pepper, garlic powder, and onion powder while they cook.
Next I deglaze the skillet with 2 to 3 tablespoons of water to lift the fond into the topping. That step blends pan flavor into the sauce and keeps the dish juicy.
- I sauté the mushrooms and onions in the same skillet used for the protein for more flavor.
- Push the cooked vegetables to the side of the pan to make room for returning the breasts.
- Finishing this step builds the savory contrast that defines the roadhouse smothered topping.
Achieving the Ideal Cheese Melt
The final bake is my go-to trick for achieving a silky, melted topping every time. After the mushrooms and onions are nestled over the breasts, a short, hot finish brings everything together.
Creating a Steam Tent
I top each piece with a slice of Monterey Jack before sliding the hot skillet into a 400 degrees F oven. Baking for 10 minutes gives the internal temp time to reach 165 degrees F while the cheese softens.
To keep the meat moist, I cover the pan with foil to form a steam tent. The trapped steam speeds the cheese melt and prevents the breasts from drying out.
- I use two ounces of monterey jack cheese per breast so each bite has a creamy layer.
- Bake 10 minutes and check the internal temperature; aim for 165 degrees F.
- Watch for slight browning on the melted cheese as your cue to remove the skillet.
- This step lets the flavors of the mushrooms, onions, and jack cheese fuse in the pan.
“A brief, high-heat bake with a steam tent gives the best melted cheese and a moist finish.”
Recommended Sides to Complete Your Meal
A few thoughtful sides turn this hearty entree into a full, satisfying dinner. I pick items that balance the richness of the monterey jack cheese and the savory mushrooms and onions.
- I love creamy mashed potatoes and buttery green beans to echo the classic texas roadhouse experience at home.
- Steamed broccoli or a crisp garden salad lightens the plate and cuts through the cheese and fat.
- Rice pilaf is a simple, neutral side that soaks up the skillet juices and adds texture.
- Season sides simply with olive oil, a pinch of black pepper, and a little garlic powder to tie flavors together.
If you have leftovers, store them in an airtight container in the fridge for up to 4 days. Reheat in the oven at 350 degrees F for 10 to 12 minutes and add a splash of water so the mushrooms and cheese stay moist.
“Choose sides that add contrast—soft, crisp, and bright—to make the meal feel like a real restaurant plate.”
Conclusion
This recipe brings a restaurant-style plate into your own kitchen with simple steps and big flavor. In minutes you can get a perfect sear, a silky cheese melt, and golden mushrooms and onion that lift the whole dish.
I find that quality ingredients — fresh mushrooms and Monterey Jack cheese — and the right heat make the biggest difference. Serve with mashed potatoes or bright sides to balance the richness.
Store leftovers in an airtight container and reheat gently so the melted cheese stays creamy. Follow this recipe and you’ll enjoy a restaurant-quality meal at home that friends ask for time and time again.