
Can a home-cooked meal truly match the creamy comfort of a restaurant favorite? I asked myself that the first time I tried this copycat recipe, and the answer surprised me.
I make this dish in about 30 minutes, using simple staples like heavy cream, butter, and garlic to build a rich alfredo sauce. Fresh parmesan and romano give the cheese a brighter flavor than pre-grated options.
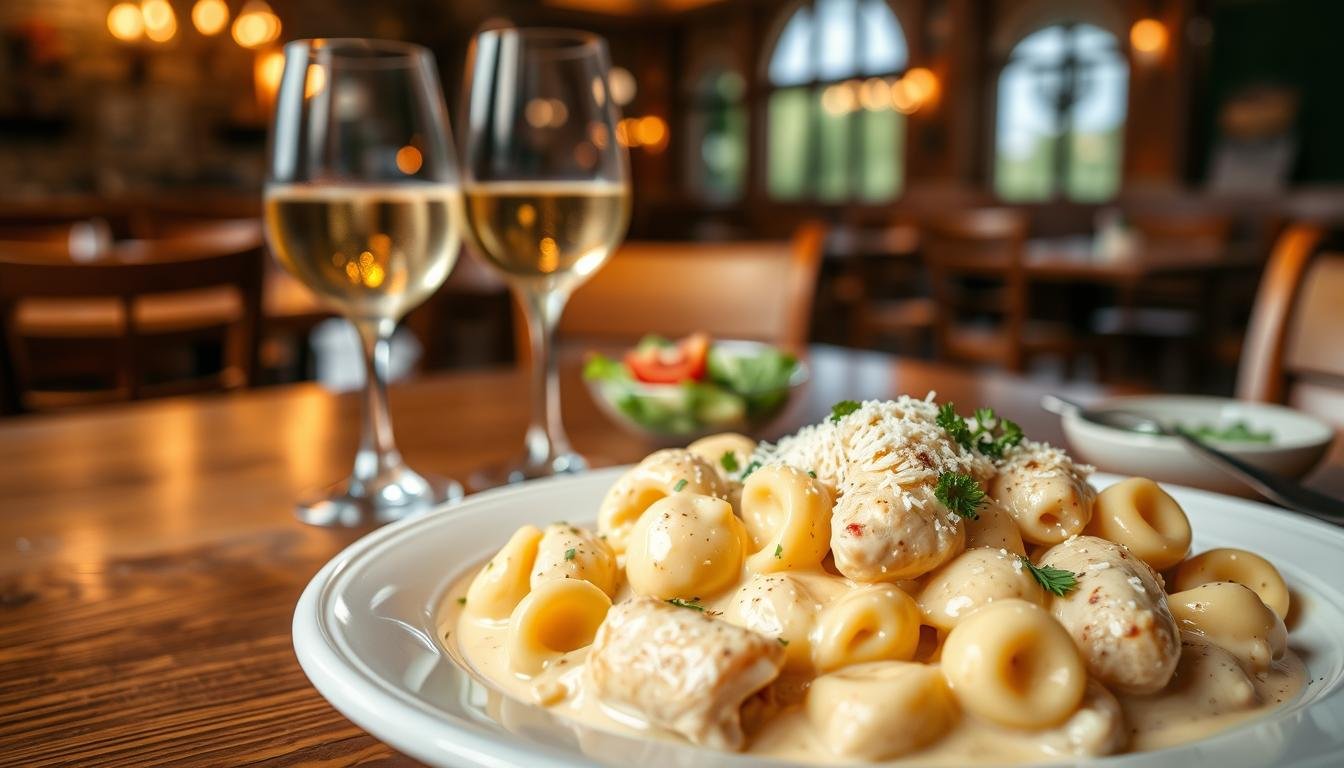
I sear skinless chicken breasts in a hot skillet, toss tender cheese tortellini with the sauce, then top with panko and a quick broil in a baking dish for a golden finish. My family loves this copycat version because it tastes like the restaurant plate without the wait.
Quick tip: Store leftovers in an airtight container for up to a week to enjoy reheated comfort any night.
Key Takeaways
- This copycat recipe delivers restaurant-style flavor at home in about 30 minutes.
- Use fresh parmesan and romano for stronger, fresher cheese flavor.
- Simple ingredients — cream, butter, garlic — create a rich homemade sauce.
- Broiling breadcrumbs on top yields a perfect golden crust.
- Leftovers keep well in an airtight container for easy reheats.
Why I Love This Olive Garden Chicken Tortellini Alfredo
I turn to this quick, creamy recipe when I need a satisfying meal on busy weeknights.
The main draw is speed: I can have this dish on the table in about 30 minutes. That time frame saves me stress and still feels like a treat.
The flavor nails the inspiration. Many copycat recipes miss the mark, but this version captures the comforting, cheesy notes I expect from Olive Garden. It’s become a household favorite when we crave something indulgent yet simple.
I also love how the chicken adds protein and balance. The process is straightforward, so I can feed a hungry family without fuss. After trying many recipes, this one remains my go-to for quick, reliable comfort.
- Fast: ready in roughly thirty minutes.
- Family-approved: creamy, cheesy, and filling.
- Trusted copycat: restaurant-style taste at home.
Essential Ingredients for Your Homemade Pasta

Good ingredients turn a simple pasta into a memorable meal. I start by gathering the key items I trust for a rich, authentic result. Quality matters more than fancy tricks.
Selecting Quality Cheeses
I always use fresh parmesan and Romano because their flavor is far stronger than pre-grated options. Adding a cup of freshly grated cheese makes a massive difference in richness.
Tip: Use freshly grated parmesan cheese for brightness and Romano for savory depth. These cheeses recreate the Olive Garden style flavor in every bite.
Choosing Your Pasta
I prefer cheese tortellini as the vessel for the sauce, but tortelloni works if you want a larger, meatier pocket. The pasta shape matters because it holds the creamy sauce and cheese in each bite.
For the sauce base, high-quality heavy cream is non-negotiable. I also use fresh garlic to build aroma and authenticity at the start of the recipe.
- Freshly grated cheese = better taste
- Cheese tortellini or tortelloni based on preference
- Heavy cream and fresh garlic for a silky sauce
Preparing the Perfect Grilled Chicken

To get juicy results, I level boneless breasts so they cook evenly in a hot skillet or in the oven.
I start by pounding boneless, skinless chicken breasts to the same thickness. This step makes the cooking time predictable and keeps the meat tender.
Next, I season both sides with salt, pepper, and garlic. A light coating of oil adds fat and helps the seasoning stick.
- Heat: Preheat a skillet or oven to high so searing locks flavors.
- Sear: Brown each piece in a high-heat oil like avocado or olive oil for color.
- Finish: Transfer to the oven for about 25 minutes or until a meat thermometer reads 165°F.
I always let the meat rest for five minutes before slicing. That final step keeps juices inside and prevents a dry dish.
This simple, step-by-step approach ensures the protein complements the pasta and supports the recipe without stealing the spotlight.
Note: For a true copycat feel, one quick mention of olive garden in your menu notes ties the plate back to the inspiration.
Mastering the Creamy Alfredo Sauce

A silky sauce makes or breaks the whole pasta, so I focus on building flavor in a hot skillet first.
I melt butter with minced garlic in a skillet over medium heat to create a fragrant base. Then I whisk in heavy cream slowly, keeping the heat steady to avoid curdling.
Achieving the right consistency
I add freshly grated parmesan cheese a little at a time while whisking. This gradual method prevents lumps and helps the sauce thicken into a smooth coating.
- Keep the pan at medium heat; high heat will separate the cream.
- Use roughly one cup of cream for the amount in this recipe and adjust cheese to taste.
- Season with a pinch of salt and pepper and stir often for even texture.
Pro tip: Stir frequently and taste as you go. The right balance of cream, cheese, and a touch of seasoning turns the sauce into the heart of the dish.
Boiling the Tortellini to Perfection

I time the pasta so it finishes just as the sauce reaches a silky, warm finish.
Start with a large pot of rapidly boiling, well-salted water. The salt seasons the pasta from the inside and improves the final taste.
I cook cheese tortellini according to the package—usually about 7 to 8 minutes—until the edges feel slightly firm but tender. You can swap in tortelloni if you prefer a bigger pocket.
Tip: Keep the sauce over low heat while the pasta boils so it stays warm but won’t split. Follow the package directions exactly to avoid overcooking the delicate filling.
Drain the pasta well in a colander, shaking off excess water before tossing it into the warm sauce. Combine immediately so the cheese pockets don’t stick and the sauce clings to every piece.
“Timing the pasta and sauce together is the simple step that turns good pasta into a great meal.”
Assembling the Dish for Baking
I toss the hot pasta with the warm alfredo sauce in a roomy glass baking dish so every piece gets coated evenly.
Next, I arrange sliced chicken across the top so it sears slightly under the broiler while the pasta stays creamy. Then I sprinkle panko and extra cheese to form a crunchy, savory crust.
Pro tip: Add a final dusting of parmesan cheese right before baking for an extra layer of flavor.
I preheat the oven to a low broil and slide the dish under the heat for just 2–3 minutes. Watch closely so the breadcrumbs brown but do not burn.
“A quick broil turns the layered pasta into a restaurant-quality dish in minutes.”
- Mix pasta and sauce in the baking dish for even distribution.
- Top with sliced protein, panko, and more cheese.
- Broil on low for 2–3 minutes, watching the top the whole time.
Helpful Tips for Success
A few focused steps make this recipe far easier and more reliable. I keep prep simple so every element finishes at the right time.
Pounding for Even Cooking
I always pound the breasts to a uniform thickness. This short prep step prevents thin edges from drying before the center cooks.
Using a Meat Thermometer
Use an instant-read thermometer to hit 165°F. That way you avoid guessing and keep the meat juicy.
Letting Meat Rest
After the oven or skillet, rest the meat at least five minutes. Resting lets juices redistribute and improves flavor.
- Mise en place: Measure ingredients, grate parmesan cheese, and warm heavy cream ahead of time.
- Season well: Salt, pepper, and garlic give the best base flavor for the sauce and meat.
- Finish: Sprinkle panko or breadcrumbs on top of the baking dish for a crunchy contrast to the creamy sauce.
“A quick thermometer check and a short rest deliver tender meat and a consistent dish every time.”
Customizing Your Pasta Experience
This base recipe is a blank canvas that I tweak depending on what’s in my fridge.
I swap tortellini for penne or rigatoni when I want a heartier bite. Changing the pasta shape shifts texture and how the sauce clings to each piece.
Omitting the chicken makes a simple vegetarian option perfect for meatless Mondays. I also steam broccoli and fold it into the sauce for color and a veggie boost.
Cheese blends are my favorite quick switch. A mix of parmesan and another sharp cheese changes depth without extra fuss. I sometimes try mushroom or spinach tortelloni for a fun twist.
If I’m pressed for time, a good jarred alfredo sauce saves minutes, though I prefer homemade cream-based versions when I can.
Make this copycat dish your own by adding fresh herbs, red pepper flakes, or lemon zest. Small tweaks keep the recipe fresh and pantry-friendly.
“A few simple swaps turn a classic into a meal that fits your weeknight needs.”
- Swap pasta shapes for texture changes
- Omit protein for an easy vegetarian meal
- Mix cheeses or try filled tortelloni for new flavors
Storing and Reheating Leftovers
I store any leftover chicken and pasta in an airtight container after the dish cools completely.
Cooling first prevents extra moisture and keeps the sauce from thinning. I refrigerate portions for up to five days in a sealed container.
For freezer meals, I pack single portions in freezer-safe containers. The recipe holds up well for about three months when wrapped and labeled.
Freezing for Future Meals
I thaw in the fridge overnight, then reheat gently. In the microwave I heat for 1–2 minutes, stirring halfway through so the sauce warms evenly.
To revive creaminess, I add a splash of cream or milk before reheating. For the best texture, reheat in a skillet over low heat and stir until the sauce and cheese blend smooth.
“A little cream and gentle heat bring leftovers back to life.”
- Cool completely before packing.
- Refrigerate up to five days in an airtight container.
- Freeze single portions up to three months.
Conclusion
In closing, this recipe proves that simple pantry staples can create a restaurant-style meal.
I hope you enjoy making this copycat Olive Garden chicken tortellini alfredo as much as my family and I do. This creamy pasta dish brings restaurant-quality flavor to your table in about thirty minutes with easy steps.
Remember: the best sauce starts with fresh parmesan and good heavy cream. Cook the chicken and tortellini properly so each bite has the right texture.
Follow the recipe or customize it—add herbs, swap tortelloni, or toast extra breadcrumbs on top. Please leave a comment to share how your version turned out. Thank you for cooking along with me.